- Finalize the features
- Set up the product website
- Release the product
Aim to finish the iP by this week!
Although the official iP submission deadline is Week 7 Monday, aim to finish the iP by this week's
1 Finalize the features
- You may give the product any name, but do not rename the repo.
- Reminder: you can give the chatbot any personality (there is no need to follow the exact command/response formats given)
- Remember to give credit to any code you reused or solutions you adopted from others. Reuse without giving credit is plagiarism and will be reported to the university for disciplinary action.
Relevant: [
Policy on reuse
Reuse is encouraged. However, note that reuse has its own costs (such as the learning curve, additional complexity, usage restrictions, and unknown bugs). Furthermore, you will not be given credit for work done by others. Rather, you will be given credit for reusing work done by others.
- You are allowed to reuse work from your classmates, subject to following conditions:
- The work has been shared publicly by us or the authors.
- You clearly give credit to the original author(s).
- You are allowed to reuse work from external sources, subject to following conditions:
- The work comes from a source of 'good standing' (such as an established open source project). This means you cannot reuse code written by an outside 'friend'.
- You clearly give credit to the original author. Acknowledge use of third party resources clearly e.g. in the welcome message, splash screen (if any) or under the 'about' menu. If you are open about reuse, you are less likely to get into trouble if you unintentionally reused something copyrighted.
- You do not violate the license under which the work has been released. Please do not use 3rd-party images/audio in your software unless they have been specifically released to be used freely. Just because you found it in the Internet does not mean it is free for reuse.
- Always get permission from us before you reuse third-party libraries. Please post your 'request to use 3rd party library' in our forum. That way, the whole class get to see what libraries are being used by others.
Giving credit for reused work
Given below are how to give credit for things you reuse from elsewhere. These requirements are specific to this module i.e., not applicable outside the module (outside the module you should follow the rules specified by your employer and the license of the reused work)
If you used a third party library:
- Mention in the
README.adoc(under the Acknowledgements section) - mention in the
Project Portfolio Page if the library has a significant relevance to the features you implemented
If you reused code snippets found on the Internet e.g. from StackOverflow answers or
referred code in another software or
referred project code by current/past student:
- If you read the code to understand the approach and implemented it yourself, mention it as a comment
Example://Solution below adapted from https://stackoverflow.com/a/16252290 {Your implmentation of the reused solution here ...} - If you copy-pasted a non-trivial code block (possibly with minor modifications renaming, layout changes, changes to comments, etc.), also mark the code block as reused code (using
@@authortags
Format://@@author {yourGithubUsername}-reused //{Info about the source...} {Reused code (possibly with minor modifications) here ...} //@@authorpersons = getList() //@@author johndoe-reused //Reused from https://stackoverflow.com/a/34646172 with minor modifications Collections.sort(persons, new Comparator<CustomData>() { @Override public int compare(CustomData lhs, CustomData rhs) { return lhs.customInt > rhs.customInt ? -1 : 0; } }); //@@author return persons;
Adding @@author tags indicate authorship
-
Mark your code with a
//@@author {yourGithubUsername}. Note the double@.
The//@@authortag should indicates the beginning of the code you wrote. The code up to the next//@@authortag or the end of the file (whichever comes first) will be considered as was written by that author. Here is a sample code file://@@author johndoe method 1 ... method 2 ... //@@author sarahkhoo method 3 ... //@@author johndoe method 4 ... -
If you don't know who wrote the code segment below yours, you may put an empty
//@@author(i.e. no GitHub username) to indicate the end of the code segment you wrote. The author of code below yours can add the GitHub username to the empty tag later. Here is a sample code with an emptyauthortag:method 0 ... //@@author johndoe method 1 ... method 2 ... //@@author method 3 ... method 4 ... -
The author tag syntax varies based on file type e.g. for java, css, fxml. Use the corresponding comment syntax for non-Java files.
Here is an example code from an xml/fxml file.<!-- @@author sereneWong --> <textbox> <label>...</label> <input>...</input> </textbox> ... -
Do not put the
//@@authorinside java header comments.
👎/** * Returns true if ... * @@author johndoe */👍
//@@author johndoe
/**
  * Returns true if ...
  */
What to and what not to annotate
-
Annotate both functional and test code There is no need to annotate documentation files.
-
Annotate only significant size code blocks that can be reviewed on its own e.g., a class, a sequence of methods, a method.
Claiming credit for code blocks smaller than a method is discouraged but allowed. If you do, do it sparingly and only claim meaningful blocks of code such as a block of statements, a loop, or an if-else statement.- If an enhancement required you to do tiny changes in many places, there is no need to annotate all those tiny changes; you can describe those changes in the Project Portfolio page instead.
- If a code block was touched by more than one person, either let the person who wrote most of it (e.g. more than 80%) take credit for the entire block, or leave it as 'unclaimed' (i.e., no author tags).
- Related to the above point, if you claim a code block as your own, more than 80% of the code in that block should have been written by yourself. For example, no more than 20% of it can be code you reused from somewhere.
- GitHub has a blame feature and a history feature that can help you determine who wrote a piece of code.
-
Do not try to boost the quantity of your contribution using unethical means such as duplicating the same code in multiple places. In particular, do not copy-paste test cases to create redundant tests. Even repetitive code blocks within test methods should be extracted out as utility methods to reduce code duplication. Individual members are responsible for making sure code attributed to them are correct. If you notice a team member claiming credit for code that he/she did not write or use other questionable tactics, you can email us (after the final submission) to let us know.
-
If you wrote a significant amount of code that was not used in the final product,
- Create a folder called
{project root}/unused - Move unused files (or copies of files containing unused code) to that folder
- use
//@@author {yourGithubUsername}-unusedto mark unused code in those files (note the suffixunused) e.g.
//@@author johndoe-unused
method 1 ...
method 2 ...
Please put a comment in the code to explain why it was not used.
- Create a folder called
-
If you reused code from elsewhere, mark such code as
//@@author {yourGithubUsername}-reused(note the suffixreused) e.g.//@@author johndoe-reused method 1 ... method 2 ... -
You can use empty
@@authortags to mark code as not yours when RepoSense attribute the to you incorrectly.-
Code generated by the IDE/framework, should not be annotated as your own.
-
Code you modified in minor ways e.g. adding a parameter. These should not be claimed as yours but you can mention these additional contributions in the Project Portfolio page if you want to claim credit for them.
-
At the end of the project each student is required to submit a Project Portfolio Page.
PPP Objectives
- For you to use (e.g. in your resume) as a well-documented data point of your SE experience
- For evaluators to use as a data point to evaluate your project contributions
PPP Sections to include
- Overview: A short overview of your product to provide some context to the reader. The opening 1-2 sentences may be reused by all team members. If your product overview extends beyond 1-2 sentences, the remainder should be written by yourself.
- Summary of Contributions --Suggested items to include:
- Code contributed: Give a link to your code on tP Code Dashboard. The link is available in the Project List Page -- linked to the icon under your photo.
- Features implemented: A summary of the features you implemented. If you implemented multiple features, you are recommended to indicate which one is the biggest feature.
- Other contributions:
- Contributions to project management e.g., setting up project tools, managing releases, managing issue tracker etc.
- Evidence of helping others e.g. responses you posted in our forum, bugs you reported in other team's products,
- Evidence of technical leadership e.g. sharing useful information in the forum
Keep in mind that your feature(s) will be evaluated for depth, completeness, and effort. Use
the PPP to convince evaluator how good those aspects of your features are.
It is fine if you want to directly explain each of those aspects of your features in the PPP i.e., how deep the feature is, why it is complete, how hard it was to implement.
-
[Optional] Contributions to the User Guide: Reproduce the parts in the User Guide that you wrote. This can include features you implemented as well as features you propose to implement.
The purpose of allowing you to include proposed features is to provide you more flexibility to show your documentation skills. e.g. you can bring in a proposed feature just to give you an opportunity to use a UML diagram type not used by the actual features. -
[Optional] Contributions to the Developer Guide: Reproduce the parts in the Developer Guide that you wrote. Ensure there is enough content to evaluate your technical documentation skills and UML modelling skills. You can include descriptions of your design/implementations, possible alternatives, pros and cons of alternatives, etc.
-
[Optional] If you plan to use the PPP in your Resume, you can also include your SE work outside of the module (will not be graded).
PPP Format
-
File name:
docs/team/githbub_username_in_lower_case.adoce.g.,docs/team/goodcoder123.adoc -
Follow the example in the AddressBook-Level3
-
You can use the Asciidoc's
includefeature to include sections from the developer guide or the user guide in your PPP. Follow the example in the sample.
PPP Page Limit
| Content | Recommended | Hard Limit |
|---|---|---|
| Overview + Summary of contributions | 0.5-1 | 2 |
| [Optional] Contributions to the User Guide | 1-3 | |
| [Optional] Contributions to the Developer Guide | 3-6 |
- The page limits given above are after converting to PDF format. The actual amount of content you require is actually less than what these numbers suggest because the HTML → PDF conversion adds a lot of spacing around content.
2 Set up a product website
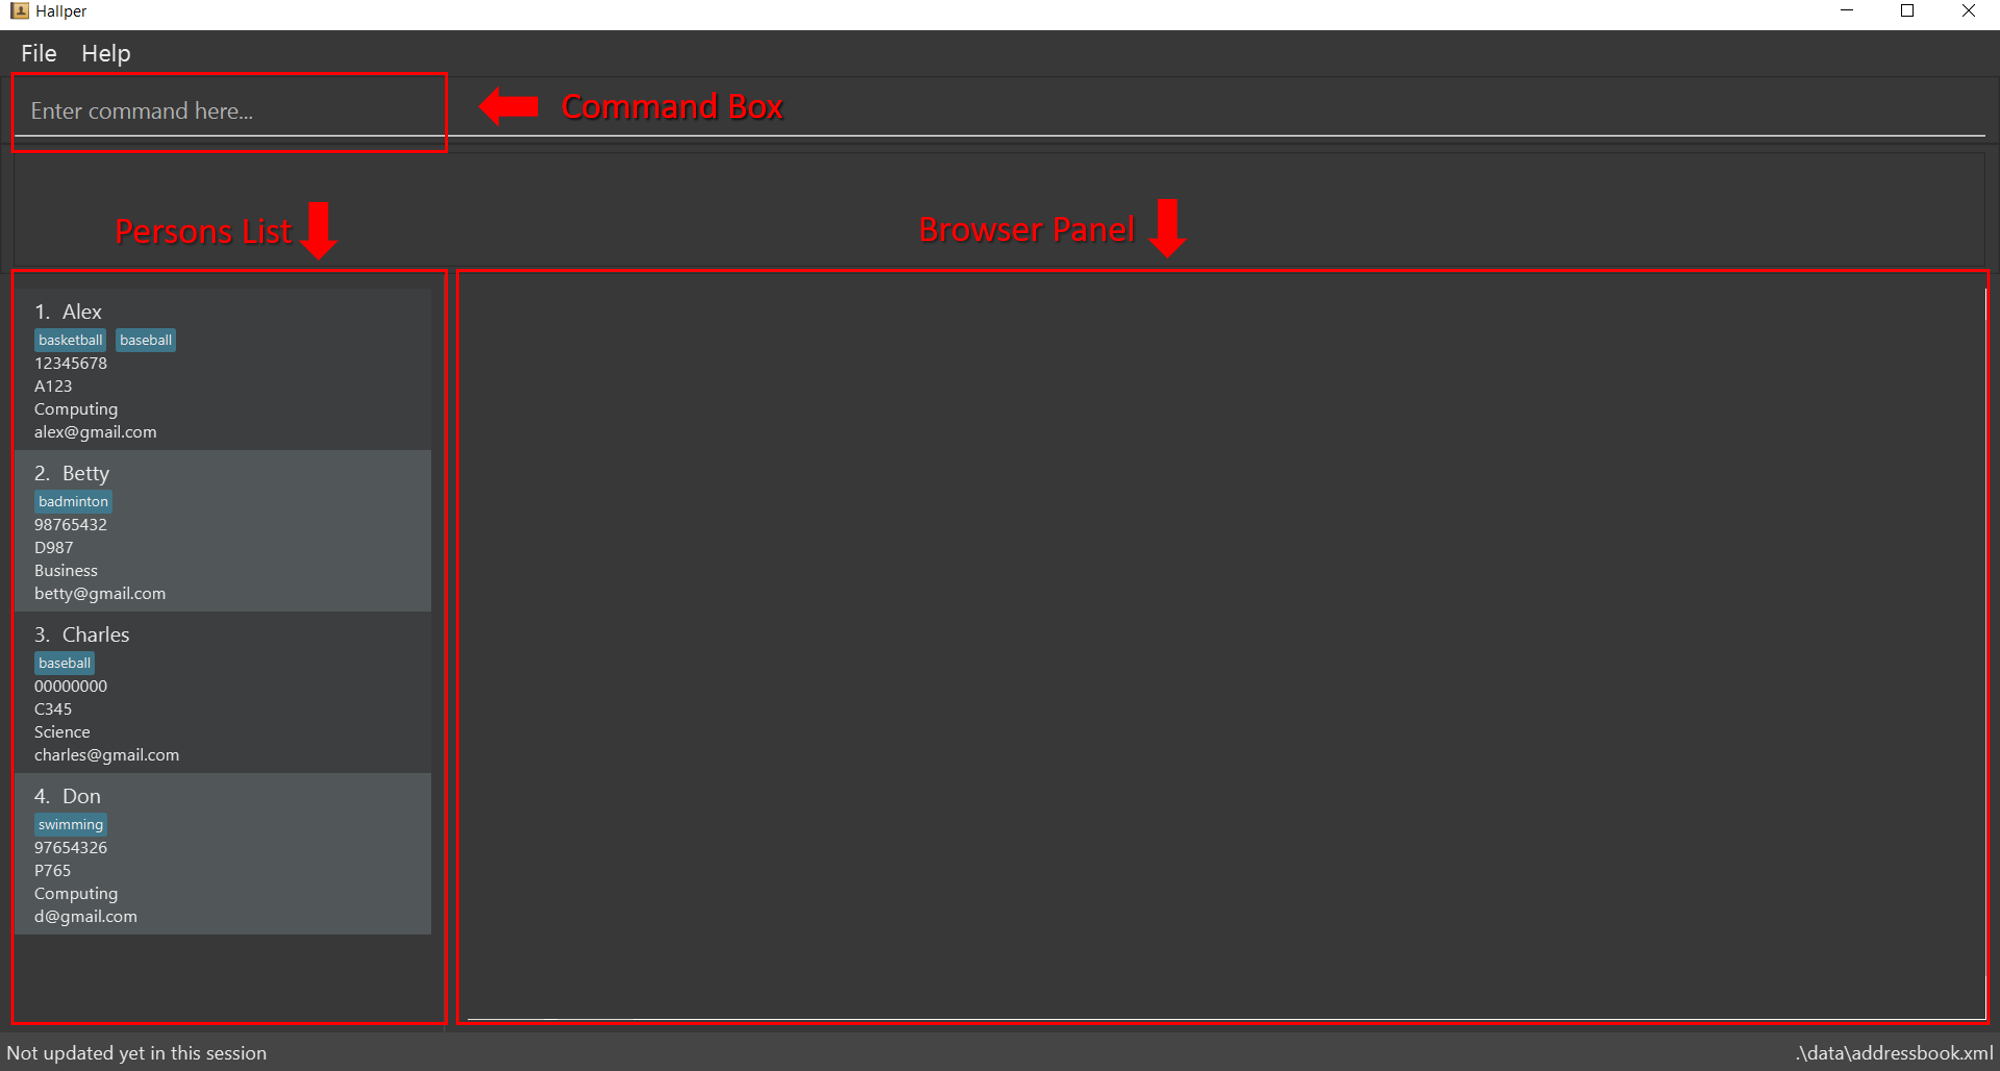
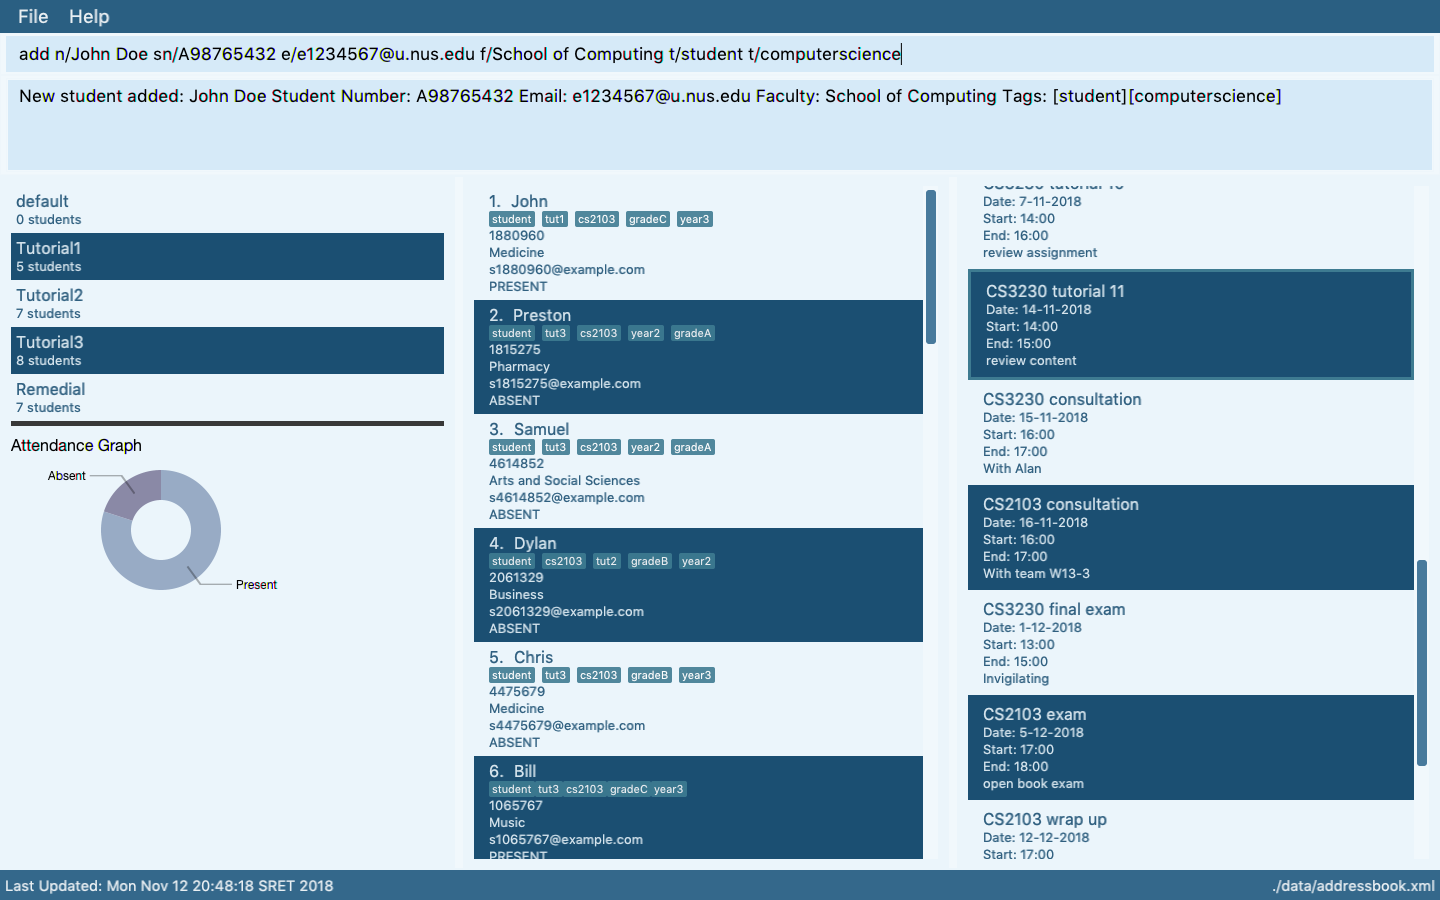
- Add a representative screenshot of the product to the
docsfolder.- The file name should be in the
docsfolder and namedUi.pngexactly (even if the file format is notpng, name itpng) - Ideally, the product name is visible in the screenshot e.g., in the title bar of the Window
- The file name should be in the
Relevant: [
Some common sense tips for a good product screenshot
Ui.png represents your product in its full glory.
- Before taking the screenshot, populate the product with data that makes the product look good. For example,
- If the product is supposed to show photos, use real photos instead of dummy placeholders.
- If the product doesn't have nice line wrapping for long inputs/outputs, don't use such inputs/outputs for the screenshot.
- It should show a state in which the product is well-populated i.e., don't leave data panels largely blank
- Choose a state that showcase the main features of the product i.e., the login screen is not usually a good choice
- Take a clean screenshot with a decent resolution. Some screenshot tools can capture a specified window only. If your tool cannot do that, make sure you crop away the extraneous parts captured by the screenshot.
- Avoid annotations (arrows, callouts, explanatory text etc.); it should look like the product is in use for real.
Reason: Distracting annotations.
Reason: Not enough data.
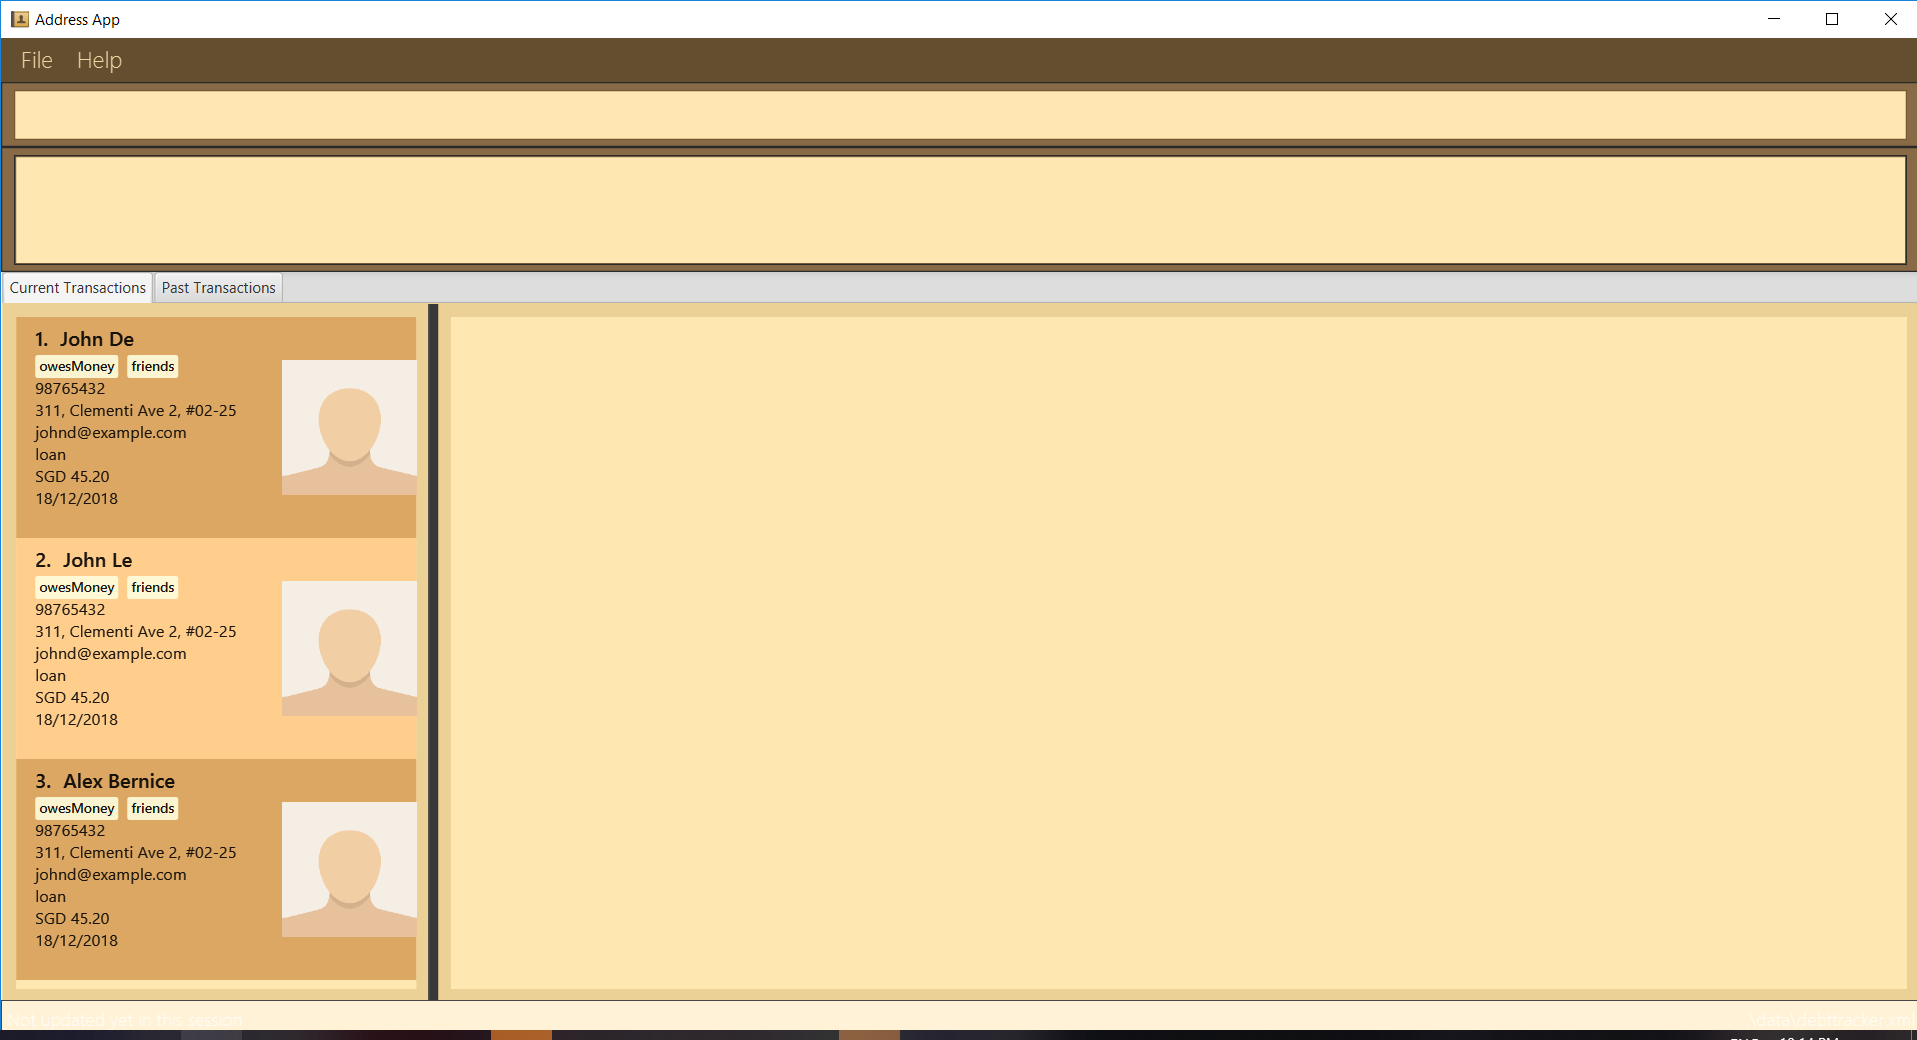
Reason: screenshot not cropped cleanly (contains extra background details)
- Add a brief User Guide (UG)
A-UserGuide: User Guide
Add a User Guide to the project. Here is one simple way to do it.
- Update the given
docs\README.md. See this guide to GitHub flavored Markdown (GFMD). - Go to the settings page of your Duke fork and enable GitHub pages to publish from the
docsfolder (you can select a theme too). - Go to
http://{your username}.github.io/duke/to view the user guide of your product.
- If you added the
Ui.pngcorrectly and set up the product website correctly, you should be able to see your screenshot in the iP Showcase page (a link to the iP Showcase page is also available in the top navigation menu → Links).
3 Release the product
- Create a new jar file using Gradle. Creating jar file using Intellij is not recommended unless the project is very simple.
- Do the following smoke tests to ensure the jar file works (reason: it will be used to grade your iP).
- Copy the jar file to an empty folder and test it from there. This should surface issues with hard-coded file paths.
- Pass the jar file to team members and ask them to do a test drive. Assuming some of your team members' OS differ from yours, this should verify if the app is cross-platform.
- Create a new release on GitHub (e.g.,
v0.2) and upload the jar file.