This site is not ready yet! The updated version will be available soon.
CS2103/T 2020 Jan-Apr
  • Full Timeline
  • Week 1 [Aug 12]
  • Week 2 [Aug 19]
  • Week 3 [Aug 26]
  • Week 4 [Sep 2]
  • Week 5 [Sep 9]
  • Week 6 [Sep 16]
  • Week 7 [Sep 30]
  • Week 8 [Oct 7]
  • Week 9 [Oct 14]
  • Week 10 [Oct 21]
  • Week 11 [Oct 28]
  • Week 12 [Nov 4]
  • Week 13 [Nov 11]
  • Textbook
  • Admin Info
  • Report Bugs
  • Forum
  • Instructors
  • Announcements
  • File Submissions
  • Tutorial Schedule
  • Java Coding Standard
  • Participation Marks List

  •  Individual Project (iP):
  • Individual Project Info
  • Duke Upstream Repo
  • iP Code Dashboard
  • iP Showcase

  •  Team Project (tP):
  • Team Project Info
  • Team IDs
  • Addressbook-level3
  • Addressbook-level 1,2,4
  • tP Code Dashboard
  • tP Showcase
  • Week 2 [Aug 19] - Topics

    • [W2.1a] Software Engineering → Introduction → Pros and Cons

    • [W2.2] IDEs: Basic Features
    • [W2.2a] Implementation → IDEs → What

    • [W2.2b] Tools → Intellij IDEA → Project Setup

    • [W2.3] Automated Testing of Text UIs
    • [W2.3a] Quality Assurance → Testing → Introduction → What

    • [W2.3b] Quality Assurance → Testing → Regression Testing → What

    • [W2.3c] Quality Assurance → Testing → Test Automation → What

    • [W2.3d] Quality Assurance → Testing → Test Automation → Automated Testing of CLI Apps

    • [W2.4] RCS: Revision History
    • [W2.4a] Project Management → Revision Control → What

    • [W2.4b] Project Management → Revision Control → Repositories

    • [W2.4c] Tools → Git and GitHub → Init

    • [W2.4d] Project Management → Revision Control → Saving History

    • [W2.4e] Tools → Git and GitHub → Commit

    • [W2.4f] Tools → Git and GitHub → Ignore

    • [W2.4g] Project Management → Revision Control → Using History

    • [W2.4h] Tools → Git and GitHub → Tag

    • [W2.4i] Tools → Git and GitHub → Checkout

    • [W2.4j] Tools → Git and GitHub → Stash

    • [W2.5] RCS: Remote Repos
    • [W2.5a] Project Management → Revision Control → Remote Repositories

    • [W2.5b] Tools → Git and GitHub → Clone

    • [W2.5c] Tools → Git and GitHub → Pull

    • [W2.5d] Tools → Git and GitHub → Push


    [W2.1] SE: Intro

    W2.1a

    Software Engineering → Introduction → Pros and Cons

    Can explain pros and cons of software engineering

    Software Engineering: Software Engineering is the application of a systematic, disciplined, quantifiable approach to the development, operation, and maintenance of software" -- IEEE Standard Glossary of Software Engineering Terminology

    The following description of the Joys of the Programming Craft was taken from Chapter 1 of the famous book The Mythical Man-Month, by Frederick P. Brooks.

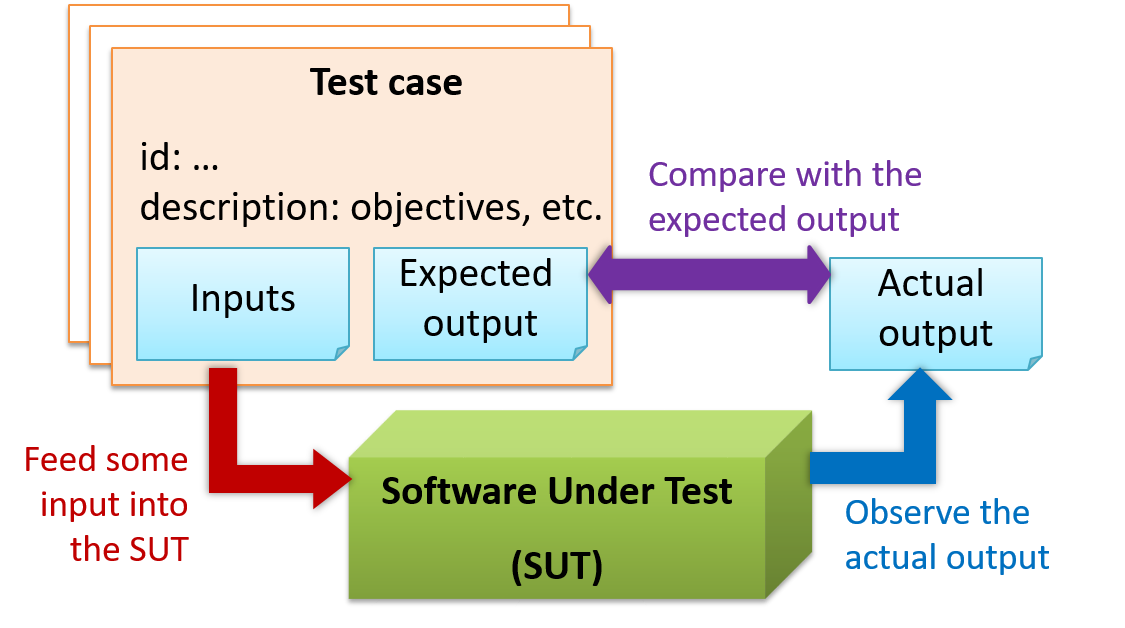
    Why is programming fun? What delights may its practitioner expect as his reward?

    First is the sheer joy of making things. As the child delights in his mud pie, so the adult enjoys building things, especially things of his own design. I think this delight must be an image of God's delight in making things, a delight shown in the distinctness and newness of each leaf and each snowflake.

    Second is the pleasure of making things that are useful to other people. Deep within, we want others to use our work and to find it helpful. In this respect the programming system is not essentially different from the child's first clay pencil holder "for Daddy's office."

    Third is the fascination of fashioning complex puzzle-like objects of interlocking moving parts and watching them work in subtle cycles, playing out the consequences of principles built in from the beginning. The programmed computer has all the fascination of the pinball machine or the jukebox mechanism, carried to the ultimate.

    Fourth is the joy of always learning, which springs from the nonrepeating nature of the task. In one way or another the problem is ever new, and its solver learns something: sometimes practical, sometimes theoretical, and sometimes both.

    Finally, there is the delight of working in such a tractable medium. The programmer, like the poet, works only slightly removed from pure thought-stuff. He builds his castles in the air, from air, creating by the exertion of the imagination. Few media of creation are so flexible, so easy to polish and rework, so readily capable of realizing grand conceptual structures....

    Yet the program construct, unlike the poet's words, is real in the sense that it moves and works, producing visible outputs separate from the construct itself. It prints results, draws pictures, produces sounds, moves arms. The magic of myth and legend has come true in our time. One types the correct incantation on a keyboard, and a display screen comes to life, showing things that never were nor could be.

    Programming then is fun because it gratifies creative longings built deep within us and delights sensibilities we have in common with all men.

    Not all is delight, however, and knowing the inherent woes makes it easier to bear them when they appear.

    First, one must perform perfectly. The computer resembles the magic of legend in this respect, too. If one character, one pause, of the incantation is not strictly in proper form, the magic doesn't work. Human beings are not accustomed to being perfect, and few areas of human activity demand it. Adjusting to the requirement for perfection is, I think, the most difficult part of learning to program.

    Next, other people set one's objectives, provide one's resources, and furnish one's information. One rarely controls the circumstances of his work, or even its goal. In management terms, one's authority is not sufficient for his responsibility. It seems that in all fields, however, the jobs where things get done never have formal authority commensurate with responsibility. In practice, actual (as opposed to formal) authority is acquired from the very momentum of accomplishment.

    The dependence upon others has a particular case that is especially painful for the system programmer. He depends upon other people's programs. These are often maldesigned, poorly implemented, incompletely delivered (no source code or test cases), and poorly documented. So he must spend hours studying and fixing things that in an ideal world would be complete, available, and usable.

    The next woe is that designing grand concepts is fun; finding nitty little bugs is just work. With any creative activity come dreary hours of tedious, painstaking labor, and programming is no exception.

    Next, one finds that debugging has a linear convergence, or worse, where one somehow expects a quadratic sort of approach to the end. So testing drags on and on, the last difficult bugs taking more time to find than the first.

    The last woe, and sometimes the last straw, is that the product over which one has labored so long appears to be obsolete upon (or before) completion. Already colleagues and competitors are in hot pursuit of new and better ideas. Already the displacement of one's thought-child is not only conceived, but scheduled.

    This always seems worse than it really is. The new and better product is generally not available when one completes his own; it is only talked about. It, too, will require months of development. The real tiger is never a match for the paper one, unless actual use is wanted. Then the virtues of reality have a satisfaction all their own.

    Of course the technological base on which one builds is always advancing. As soon as one freezes a design, it becomes obsolete in terms of its concepts. But implementation of real products demands phasing and quantizing. The obsolescence of an implementation must be measured against other existing implementations, not against unrealized concepts. The challenge and the mission are to find real solutions to real problems on actual schedules with available resources.

    This then is programming, both a tar pit in which many efforts have floundered and a creative activity with joys and woes all its own. For many, the joys far outweigh the woes....

    [Text and book cover source: Wikipedia]

    [Fred Brooks photo source]

    The Mythical Man-Month: Essays on Software Engineering is a book on software engineering and project management by Fred Brooks, whose central theme is that "adding manpower to a late software project makes it later". This idea is known as Brooks's law, and is presented along with the second-system effect and advocacy of prototyping.

    Compare Software Engineering with Civil Engineering in terms of how work products in CE (i.e. buildings) differ from those of SE (i.e. software).

    Buildings Software
    Visible, tangible Invisible, intangible
    Wears out over time Does not wear out
    Change is limited by physical restrictions (e.g. difficult to remove a floor from a high rise building) Change is not limited by such restrictions. Just change the code and recompile.
    Creating an exact copy of a building is impossible. Creating a near copy is almost as costly as creating the original. Any number of exact copies can be made with near zero cost.
    Difficult to move. Easily delivered from one place to another.
    Many low-skilled workers following tried-and-tested procedures. No low-skilled workers involved. Workers have more freedom to follow their own procedures.
    Easier to assure quality (just follow accepted procedure). Not easy to assure quality.
    Majority of the work force has to be on location. Can be built by people who are not even in the same country.
    Raw materials are costly, costly equipment required. Almost free raw materials and relatively cheap equipment.
    Once construction is started, it is hard to do drastic changes to the design. Building process is very flexible. Drastic design changes can be done, although costly
    A lot of manual and menial labor involved. Most work involves highly-skilled labor.
    Generally robust. E.g. removing a single brick is unlikely to destroy a building. More fragile than buildings. A single misplaced semicolon can render the whole system useless.

    Comment on this statement: Building software is cheaper and easier than building bridges (all we need is a PC!).

    Depends on the size of the software. Manpower required for software is very costly. On the other hand, we can create a very valuable software (e.g. an iPhone application that can make million dollars in a month) with a just a PC and a few days of work!

    Justify this statement: Coding is still a ‘design’ activity, not a ‘manufacturing’ activity. You may use a comparison (or an analogy) of Software engineering versus Civil Engineering to argue this point.

    Arguments to support this statement:

    • If coding is a manufacturing activity, we should be able to do it using robotic machines (just like in the car industry) or low-skilled laborers (like in the construction industry).
    • If coding is a manufacturing activity, we wouldn’t be changing it so much after we code software. But if the code is in fact a ‘design’, yes, we would fiddle with it until we get it right.
    • Manufacturing is the process of building a finished product based on the design. Code is the design. Manufacturing is what is done by the compiler (fully automated).

    However, the type of ‘design’ that occurs during coding is at a much lower level than the ‘design’ that occurs before coding.

    List some (at least three each) pros and cons of Software Engineering compared to other traditional Engineering careers.

    • a. Need for perfection when developing software
    • b. Requiring some amount of tedious, painstaking labor
    • c. Ease of copying and transporting software makes it difficult to keep track of versions
    • d. High dependence on others
    • e. Seemingly never ending effort required for testing and debugging software
    • f. Fast moving industry making our work obsolete quickly

    (c)

    [W2.2] IDEs: Basic Features

    W2.2a

    Implementation → IDEs → What

    Can explain IDEs

    Professional software engineers often write code using Integrated Development Environments (IDEs). IDEs support most development-related work within the same tool (hence, the term integrated).

    An IDE generally consists of:

    • A source code editor that includes features such as syntax coloring, auto-completion, easy code navigation, error highlighting, and code-snippet generation.
    • A compiler and/or an interpreter (together with other build automation support) that facilitates the compilation/linking/running/deployment of a program.
    • A debugger that allows the developer to execute the program one step at a time to observe the run-time behavior in order to locate bugs.
    • Other tools that aid various aspects of coding e.g. support for automated testing, drag-and-drop construction of UI components, version management support, simulation of the target runtime platform, and modeling support.

    Examples of popular IDEs:

    • Java: Eclipse, Intellij IDEA, NetBeans
    • C#, C++: Visual Studio
    • Swift: XCode
    • Python: PyCharm

    Some Web-based IDEs have appeared in recent times too e.g., Amazon's Cloud9 IDE.

    Some experienced developers, in particular those with a UNIX background, prefer lightweight yet powerful text editors with scripting capabilities (e.g. Emacs) over heavier IDEs.

    • a. Compiling
    • b. Syntax error highlighting
    • c. Debugging
    • d. Code navigation e.g., to navigate from a method call to the method implementation
    • e. Simulation e.g., run a mobile app in a simulator
    • f. Code analysis e.g. to find unreachable code
    • g. Reverse engineering design/documentation e.g. generate diagrams from code
    • h. Visual programming e.g. Write programs using ‘drag and drop’ actions instead of typing code
    • i. Syntax assistance e.g., show hints as you type
    • j. Code generation e.g., to generate the code required by simply specifying which component/structure you want to implement
    • k. Extension i.e., ability add more functionality to the IDE using plugins

    All.

    Explanation: While all of these features may not be present in some IDEs, most do have these features in some form or other.

    W2.2b

    Tools → Intellij IDEA → Project Setup

    Can setup a project in an IDE

    Running Intellij IDEA for the First Time

    A little bit more detailed explanation (from CodeLaunch) with some additional info at the end.


    Importing a Project to Intellij IDEA

    [W2.3] Automated Testing of Text UIs

    W2.3a

    Quality Assurance → Testing → Introduction → What

    Can explain testing

    Testing: Operating a system or component under specified conditions, observing or recording the results, and making an evaluation of some aspect of the system or component. –- source: IEEE

    When testing, we execute a set of test cases. A test case specifies how to perform a test. At a minimum, it specifies the input to the software under test (SUT) and the expected behavior.

    Example: A minimal test case for testing a browser:

    • Input – Start the browser using a blank page (vertical scrollbar disabled). Then, load longfile.html located in the test data folder.
    • Expected behavior – The scrollbar should be automatically enabled upon loading longfile.html.

    Test cases can be determined based on the specification, reviewing similar existing systems, or comparing to the past behavior of the SUT.

    Other details a test case can contain extra A more elaborate test case can have other details such as those given below.
    • A unique identifier : e.g. TC0034-a
    • A descriptive name: e.g. vertical scrollbar activation for long web pages
    • Objectives: e.g. to check whether the vertical scrollbar is correctly activated when a long web page is loaded to the browser
    • Classification information: e.g. priority - medium, category - UI features
    • Cleanup, if any: e.g. empty the browser cache.

    For each test case we do the following:

    1. Feed the input to the SUT
    2. Observe the actual output
    3. Compare actual output with the expected output

    A test case failure is a mismatch between the expected behavior and the actual behavior. A failure indicates a potential defect (or a bug), unless the error is in the test case itself.

    Example: In the browser example above, a test case failure is implied if the scrollbar remains disabled after loading longfile.html. The defect/bug causing that failure could be an uninitialized variable.

    A deeper look at the definition of testing extra

    Here is another definition of testing:

    Software testing consists of the dynamic verification that a program provides expected behaviors on a finite set of test cases, suitably selected from the usually infinite execution domain. -– source: Software Engineering Book of Knowledge V3

    Some things to note (indicated by keywords in the above definition):

    • Dynamic: Testing involves executing the software. It is not by examining the code statically.
    • Finite: In most non-trivial cases there are potentially infinite test scenarios but resource constraints dictate that we can test only a finite number of scenarios.
    • Selected: In most cases it is not possible to test all scenarios. That means we need to select what scenarios to test.
    • Expected: Testing requires some knowledge of how the software is expected to behave.

    Explain how the concepts of testing, test case, test failure, and defect are related to each other.

    W2.3b

    Quality Assurance → Testing → Regression Testing → What

    Can explain regression testing

    When we modify a system, the modification may result in some unintended and undesirable effects on the system. Such an effect is called a regression.

    Regression testing is the re-testing of the software to detect regressions. Note that to detect regressions, we need to retest all related components, even if they had been tested before.

    Regression testing is more effective when it is done frequently, after each small change. However, doing so can be prohibitively expensive if testing is done manually. Hence, regression testing is more practical when it is automated.

    Regression testing is the automated re-testing of a software after it has been modified.

    c.

    Explanation: Regression testing need not be automated but automation is highly recommended.

    Explain why and when you would do regression testing in a software project.

    W2.3c

    Quality Assurance → Testing → Test Automation → What

    Can explain test automation

    An automated test case can be run programmatically and the result of the test case (pass or fail) is determined programmatically. Compared to manual testing, automated testing reduces the effort required to run tests repeatedly and increases precision of testing (because manual testing is susceptible to human errors).

    W2.3d

    Quality Assurance → Testing → Test Automation → Automated Testing of CLI Apps

    Can semi-automate testing of CLIs

    A simple way to semi-automate testing of a CLI(Command Line Interface) app is by using input/output re-direction.

    • First, we feed the app with a sequence of test inputs that is stored in a file while redirecting the output to another file.
    • Next, we compare the actual output file with another file containing the expected output.

    Let us assume we are testing a CLI app called AddressBook. Here are the detailed steps:

    1. Store the test input in the text file input.txt.

      add Valid Name p/12345 valid@email.butNoPrefix
      add Valid Name 12345 e/valid@email.butPhonePrefixMissing
      
    2. Store the output we expect from the SUT in another text file expected.txt.

      Command: || [add Valid Name p/12345 valid@email.butNoPrefix]
      Invalid command format: add 
      
      Command: || [add Valid Name 12345 e/valid@email.butPhonePrefixMissing]
      Invalid command format: add 
      
    3. Run the program as given below, which will redirect the text in input.txt as the input to AddressBook and similarly, will redirect the output of AddressBook to a text file output.txt. Note that this does not require any code changes to AddressBook.

      java AddressBook < input.txt > output.txt
      
      • The way to run a CLI program differs based on the language.
        e.g., In Python, assuming the code is in AddressBook.py file, use the command
        python AddressBook.py < input.txt > output.txt

      • If you are using Windows, use a normal command window to run the app, not a Power Shell window.

      More on the > operator and the < operator extra

      A CLI program takes input from the keyboard and outputs to the console. That is because those two are default input and output streams, respectively. But you can change that behavior using < and > operators. For example, if you run AddressBook in a command window, the output will be shown in the console, but if you run it like this,

      java AddressBook > output.txt 
      

      the Operating System then creates a file output.txt and stores the output in that file instead of displaying it in the console. No file I/O coding is required. Similarly, adding < input.txt (or any other filename) makes the OS redirect the contents of the file as input to the program, as if the user typed the content of the file one line at a time.

      Resources:

    4. Next, we compare output.txt with the expected.txt. This can be done using a utility such as Windows FC (i.e. File Compare) command, Unix diff command, or a GUI tool such as WinMerge.

      FC output.txt expected.txt
      

    Note that the above technique is only suitable when testing CLI apps, and only if the exact output can be predetermined. If the output varies from one run to the other (e.g. it contains a time stamp), this technique will not work. In those cases we need more sophisticated ways of automating tests.

    CLI App: An application that has a Command Line Interface. i.e. user interacts with the app by typing in commands.

    [W2.4] RCS: Revision History

    W2.4a

    Project Management → Revision Control → What

    Can explain revision control

    Revision control is the process of managing multiple versions of a piece of information. In its simplest form, this is something that many people do by hand: every time you modify a file, save it under a new name that contains a number, each one higher than the number of the preceding version.

    Manually managing multiple versions of even a single file is an error-prone task, though, so software tools to help automate this process have long been available. The earliest automated revision control tools were intended to help a single user to manage revisions of a single file. Over the past few decades, the scope of revision control tools has expanded greatly; they now manage multiple files, and help multiple people to work together. The best modern revision control tools have no problem coping with thousands of people working together on projects that consist of hundreds of thousands of files.

    Revision control software will track the history and evolution of your project, so you don't have to. For every change, you'll have a log of who made it; why they made it; when they made it; and what the change was.

    Revision control software makes it easier for you to collaborate when you're working with other people. For example, when people more or less simultaneously make potentially incompatible changes, the software will help you to identify and resolve those conflicts.

    It can help you to recover from mistakes. If you make a change that later turns out to be an error, you can revert to an earlier version of one or more files. In fact, a really good revision control tool will even help you to efficiently figure out exactly when a problem was introduced.

    It will help you to work simultaneously on, and manage the drift between, multiple versions of your project. Most of these reasons are equally valid, at least in theory, whether you're working on a project by yourself, or with a hundred other people.

    -- [adapted from bryan-mercurial-guide

    Mercurial: The Definitive Guide by Bryan O'Sullivan retrieved on 2012/07/11

    RCS: Revision Control Software are the software tools that automate the process of Revision Control i.e. managing revisions of software artifacts.

    Revision: A revision (some seem to use it interchangeably with version while others seem to distinguish the two -- here, let us treat them as the same, for simplicity) is a state of a piece of information at a specific time that is a result of some changes to it e.g., if you modify the code and save the file, you have a new revision (or a version) of that file.

    Revision control software are also known as Version Control Software (VCS), and by a few other names.

    Revision Control Software

    In the context of RCS, what is a Revision? Give an example.

    A revision (some seem to use it interchangeably with version while others seem to distinguish the two -- here, let us treat them as the same, for simplicity) is a state of a piece of information at a specific time that is a result of some changes to it. For example, take a file containing program code. If you modify the code and save the file, you have a new revision (or a version) of that file.

    • a. Help a single user manage revisions of a single file
    • b. Help a developer recover from a incorrect modification to a code file
    • c. Makes it easier for a group of developers to collaborate on a project
    • d. Manage the drift between multiple versions of your project
    • e. Detect when multiple developers make incompatible changes to the same file
    • f. All of them are benefits of RCS

    f

    Suppose You are doing a team project with Tom, Dick, and Harry but those three have not even heard the term RCS. How do you explain RCS to them as briefly as possible, using the project as an example?

    W2.4b

    Project Management → Revision Control → Repositories

    Can explain repositories

    Repository (repo for short): The database of the history of a directory being tracked by an RCS software (e.g. Git).

    The repository is the database where the meta-data about the revision history are stored. Suppose you want to apply revision control on files in a directory called ProjectFoo. In that case you need to set up a repo (short for repository) in ProjectFoo directory, which is referred to as the working directory of the repo. For example, Git uses a hidden folder named .git inside the working directory.

    You can have multiple repos in your computer, each repo revision-controlling files of a different working directly, for examples, files of different projects.

    In the context of RCS, what is a repo?

    W2.4c

    Tools → Git and GitHub → Init

    Can create a local Git repo

    Soon you are going to take your first step in using Git. If you would like to see a quick overview of the full Git landscape before jumping in, watch the video below.

    Install SourceTree which is Git + a GUI for Git. If you prefer to use Git via the command line (i.e., without a GUI), you can install Git instead.

    Suppose you want to create a repository in an empty directory things. Here are the steps:

    Windows: Click FileClone/New…. Click on Create button.
    Mac: New...Create New Repository.

    Enter the location of the directory (Windows version shown below) and click Create.

    Go to the things folder and observe how a hidden folder .git has been created.

    Note: If you are on Windows, you might have to configure Windows Explorer to show hidden files.

    Open a Git Bash Terminal.

    If you installed SourceTree, you can click the Terminal button to open a GitBash terminal.

    Navigate to the things directory.

    Use the command git init which should initialize the repo.

    $ git init
    Initialized empty Git repository in c:/repos/things/.git/
    

    You can use the command ls -a to view all files, which should show the .git directory that was created by the previous command.

    $ ls -a
    .  ..  .git
    

    You can also use the git status command to check the status of the newly-created repo. It should respond with something like the bellow

    git status
    

    # On branch master
    #
    # Initial commit
    #
    nothing to commit (create/copy files and use "git add" to track)
    

    W2.4d

    Project Management → Revision Control → Saving History

    Can explain saving history

    Tracking and Ignoring

    In a repo, we can specify which files to track and which files to ignore. Some files such as temporary log files created during the build/test process should not be revision-controlled.

    Staging and Committing

    Committing saves a snapshot of the current state of the tracked files in the revision control history. Such a snapshot is also called a commit (i.e. the noun).

    When ready to commit, we first stage the specific changes we want to commit. This intermediate step allows us to commit only some changes while saving other changes for a later commit.

    Identifying Points in History

    Each commit in a repo is a recorded point in the history of the project that is uniquely identified by an auto-generated hash e.g. a16043703f28e5b3dab95915f5c5e5bf4fdc5fc1.

    We can tag a specific commit with a more easily identifiable name e.g. v1.0.2

    W2.4e

    Tools → Git and GitHub → Commit

    Can commit using Git

    Create an empty repo.

    Create a file named fruits.txt in the working directory and add some dummy text to it.

    Working directory: The directory the repo is based in is called the working directory.

    Observe how the file is detected by Git.

    The file is shown as ‘unstaged’

    You can use the git status command to check the status of the working directory.

    git status
    

    # On branch master
    #
    # Initial commit
    #
    # Untracked files:
    #   (use "git add <file>..." to include in what will be committed)
    #
    #   a.txt
    nothing added to commit but untracked files present (use "git add" to track)
    

    Although git has detected the file in the working directory, it will not do anything with the file unless you tell it to. Suppose we want to commit the current state of the file. First, we should stage the file.

    Commit: Saving the current state of the working folder into the Git revision history.

    Stage: Instructing Git to prepare a file for committing.

    Select the fruits.txt and click on the Stage Selected button

    fruits.txt should appear in the Staged files panel now.

    You can use the stage or the add command (they are synonyms, add is the more popular choice) to stage files.

    git add fruits.txt
    git status
    

    # On branch master
    #
    # Initial commit
    #
    # Changes to be committed:
    #   (use "git rm --cached <file>..." to unstage)
    #
    #       new file:   fruits.txt
    #
    

    Now, you can commit the staged version of fruits.txt

    Click the Commit button, enter a commit message e.g. add fruits.txt in to the text box, and click Commit

    Use the commit command to commit. The -m switch is used to specify the commit message.

    git commit -m "add fruits.txt"
    

    You can use the log command to see the commit history

    git log
    

    commit 8fd30a6910efb28bb258cd01be93e481caeab846
    Author: … < … @... >
    Date:   Wed Jul 5 16:06:28 2017 +0800
    
      Add fruits.txt
    

    Note the existence of something called the master branch. Git allows you to have multiple branches (i.e. it is a way to evolve the content in parallel) and Git creates a default branch named master on which the commits go on by default.

    Do some changes to fruits.txt (e.g. add some text and delete some text). Stage the changes, and commit the changes using the same steps you followed before. You should end up with something like this.

    Next, add two more files colors.txt and shapes.txt to the same working directory. Add a third commit to record the current state of the working directory.

    • Try Git is an online simulation/tutorial of Git basics. You can try its first few steps to solidify what you learned in this LO.

    W2.4f

    Tools → Git and GitHub → Ignore

    Can set Git to ignore files

    Add a file named temp.txt to the things repo you created. Suppose we don’t want this file to be revision controlled by Git. Let’s instruct Git to ignore temp.txt

    The file should be currently listed under Unstaged files. Right-click it and choose Ignore…. Choose Ignore exact filename(s) and click OK.

    Observe that a file named .gitignore has been created in the working directory root and has the following line in it.

    temp.txt
    

    Create a file named .gitignore in the working directory root and add the following line in it.

    temp.txt
    

    The .gitignore file tells Git which files to ignore when tracking revision history. That file itself can be either revision controlled or ignored.

    • To version control it (the more common choice – which allows you to track how the .gitignore file changed over time), simply commit it as you would commit any other file.
    • To ignore it, follow the same steps we followed above when we set Git to ignore the temp.txt file.

    W2.4g

    Project Management → Revision Control → Using History

    Can explain using history

    RCS tools store the history of the working directory as a series of commits. This means we should commit after each change that we want the RCS to 'remember' for us.

    To see what changed between two points of the history, you can ask the RCS tool to diff the two commits in concern.

    To restore the state of the working directory at a point in the past, you can checkout the commit in concern. i.e., we can traverse the history of the working directory simply by checking out the commits we are interested in.

    RCS: Revision Control Software are the software tools that automate the process of Revision Control i.e. managing revisions of software artifacts.

    W2.4h

    Tools → Git and GitHub → Tag

    Can tag commits using Git

    Let's tag a commit in a local repo you have (e.g. the sampelrepo-things repo)

    Right-click on the commit (in the graphical revision graph) you want to tag and choose Tag…

    Specify the tag name e.g. v1.0 and click Add Tag.

    The added tag will appear in the revision graph view.

    To add a tag to the current commit as v1.0,

    git tag –a v1.0
    

    To view tags

    git tag
    

    To learn how to add a tag to a past commit, go to the ‘Git Basics – Tagging’ page of the git-scm book and refer the ‘Tagging Later’ section.

    Remember to push tags to the repo. A normal push does not include tags.

    # push a specific tag
    git push origin v1.0b
    
    # push all tags
    git push origin --tags
    

    W2.4i

    Tools → Git and GitHub → Checkout

    Can load a specific version of a Git repo

    Git can show you what changed in each commit.

    To see which files changed in a commit, click on the commit. To see what changed in a specific file in that commit, click on the file name.

    git show < part-of-commit-hash >
    

    Example:

    git show 251b4cf
    

    commit 5bc0e30635a754908dbdd3d2d833756cc4b52ef3
    Author: … < … >
    Date:   Sat Jul 8 16:50:27 2017 +0800
    
        fruits.txt: replace banana with berries
    
    diff --git a/fruits.txt b/fruits.txt
    index 15b57f7..17f4528 100644
    --- a/fruits.txt
    +++ b/fruits.txt
    @@ -1,3 +1,3 @@
     apples
    -bananas
    +berries
     cherries
    

    Git can also show you the difference between two points in the history of the repo.

    Select the two points you want to compare using Ctrl+Click.

    The same method can be used to compare the current state of the working directory (which might have uncommitted changes) to a point in the history.

    The diff command can be used to view the differences between two points of the history.

    • git diff : shows the changes (uncommitted) since the last commit
    • git diff 0023cdd..fcd6199: shows the changes between the points indicated by by commit hashes
    • git diff v1.0..HEAD: shows changes that happened from the commit tagged as v1.0 to the most recent commit.

    Git can load a specific version of the history to the working directory. Note that if you have uncommitted changes in the working directory, you need to stash them first to prevent them from being overwritten.

    Tools → Git and GitHub →

    Stash

    You can use the git's stash feature to temporarily shelve (or stash) changes you've made to your working copy so that you can work on something else, and then come back and re-apply the stashed changes later on. -- adapted from this

    Follow this article from SourceTree creators. Note the GUI shown in the article is slightly outdated but you should be able to map it to the current GUI.

    Follow this article from Atlassian.

    Double-click the commit you want to load to the working directory, or right-click on that commit and choose Checkout....

    Click OK to the warning about ‘detached HEAD’ (similar to below).

    The specified version is now loaded to the working folder, as indicated by the HEAD label. HEAD is a reference to the currently checked out commit.

    If you checkout a commit that come before the commit in which you added the .gitignore file, Git will now show ignored fiels as ‘unstaged modifications’ because at that stage Git hasn’t been told to ignore those files.

    To go back to the latest commit, double-click it.

    Use the checkout <commit-identifier> command to change the working directory to the state it was in at a specific past commit.

    • git checkout v1.0: loads the state as at commit tagged v1.0
    • git checkout 0023cdd: loads the state as at commit with the hash 0023cdd
    • git checkout HEAD~2: loads the state that is 2 commits behind the most recent commit

    For now, you can ignore the warning about ‘detached HEAD’.

    Use the checkout <branch-name> to go back to the most recent commit of the current branch (the default branch in git is named master)

    • git checkout master

    W2.4j

    Tools → Git and GitHub → Stash

    Can use Git to stash files

    You can use the git's stash feature to temporarily shelve (or stash) changes you've made to your working copy so that you can work on something else, and then come back and re-apply the stashed changes later on. -- adapted from this

    Follow this article from SourceTree creators. Note the GUI shown in the article is slightly outdated but you should be able to map it to the current GUI.

    Follow this article from Atlassian.

    [W2.5] RCS: Remote Repos

    W2.5a

    Project Management → Revision Control → Remote Repositories

    Can explain remote repositories

    Remote repositories are copies of a repo that are hosted on remote computers. They are especially useful for sharing the revision history of a codebase among team members of a multi-person project. They can also serve as a remote backup of your code base.

    You can clone a remote repo onto your computer which will create a copy of a remote repo on your computer, including the version history as the remote repo.

    You can push new commits in your clone to the remote repo which will copy the new commits onto the remote repo. Note that pushing to a remote repo requires you to have write-access to it.

    You can pull from the remote repos to receive new commits in the remote repo. Pulling is used to sync your local repo with latest changes to the remote repo.

    While it is possible to set up your own remote repo on a server, an easier option is to use a remote repo hosting service such as GitHub or BitBucket.

    A fork is a remote copy of a remote repo. If there is a remote repo that you want to push to but you do not have write access to it, you can fork the remote repo, which gives you your own remote repo that you can push to.

    A pull request is mechanism for contributing code to a remote repo. It is a formal request sent to the maintainers of the repo asking them to pull your new code to their repo.

    Here is a scenario that includes all the concepts introduced above (click on the slide to advance the animation):

    W2.5b

    Tools → Git and GitHub → Clone

    Can clone a remote repo

    Clone the sample repo samplerepo-things to your computer.

    Note that the URL of the Github project is different form the URL you need to clone a repo in that Github project. e.g.

    Github project URL: https://github.com/se-edu/samplerepo-things
    Git repo URL: https://github.com/se-edu/samplerepo-things.git (note the .git at the end)

    FileClone / New… and provide the URL of the repo and the destination directory.

    You can use the clone command to clone a repo.

    Follow instructions given here.

    W2.5c

    Tools → Git and GitHub → Pull

    Can pull changes from a repo

    Clone the sample repo as explained in [Textbook Tools → Git & GitHub → Clone].

    Delete the last two commits to simulate cloning the repo 2 commits ago.

    Clone

    Can clone a remote repo

    Clone the sample repo samplerepo-things to your computer.

    Note that the URL of the Github project is different form the URL you need to clone a repo in that Github project. e.g.

    Github project URL: https://github.com/se-edu/samplerepo-things
    Git repo URL: https://github.com/se-edu/samplerepo-things.git (note the .git at the end)

    FileClone / New… and provide the URL of the repo and the destination directory.

    You can use the clone command to clone a repo.

    Follow instructions given here.

    Right-click the target commit (i.e. the commit that is 2 commits behind the tip) and choose Reset current branch to this commit.

    Choose the Hard - … option and click OK.

    This is what you will see.

    Note the following (cross refer the screenshot above):

    Arrow marked as a: The local repo is now at this commit, marked by the master label.
    Arrow marked as b: origin/master label shows what is the latest commit in the master branch in the remote repo.

    Use the reset command to delete commits at the tip of the revision history.

    git reset --hard HEAD~2
    

    Now, your local repo state is exactly how it would be if you had cloned the repo 2 commits ago, as if somebody has added two more commits to the remote repo since you cloned it. To get those commits to your local repo (i.e. to sync your local repo with upstream repo) you can do a pull.

    Click the Pull button in the main menu, choose origin and master in the next dialog, and click OK.

    Now you should see something like this where master and origin/master are both pointing the same commit.

    git pull origin

    W2.5d

    Tools → Git and GitHub → Push

    Can push to a remote repo

    1. Create a GitHub account if you don't have one yet.

    2. Fork the samplerepo-things to your GitHub account:

      Navigate to the on GitHub and click on the button on the top-right corner.

    3. Clone the fork (not the original) to your computer.

    4. Create some commits in your repo.

    5. Push the new commits to your fork on GitHub

    Click the Push button on the main menu, ensure the settings are as follows in the next dialog, and click the Push button on the dialog.

    Tags are not included in a normal push. Remember to tick Push all tags when pushing to the remote repo if you want them to be pushed to the repo.

    Use the command git push origin master. Enter Github username and password when prompted.

    Tags are not included in a normal push. To push a tag, use this command: git push origin <tag_name> e.g.. git push origin v1.0

    Pushing an existing local repo into a new remote repo on GitHub extra

    First, you need to create an empty remote repo on GitHub.

    1. Login to your GitHub account and choose to create a new Repo.

    2. In the next screen, provide a name for your repo but keep the Initialize this repo ... tick box unchecked.

    3. Note the URL of the repo. It will be of the form https://github.com/{your_user_name}/{repo_name}.git
      e.g., https://github.com/johndoe/foobar.git

    Next, you can push the existing local repo to the new remote repo as follows:

    1. Open the local repo in SourceTree.
    2. Choose RepositoryRepository Settings menu option.
    3. Add a new remote to the repo with the following values.
      • Remote name: the name you want to assign to the remote repo. Recommended origin
      • URL/path: the URL of your repo (ending in .git) that you collected earlier.
      • Username: your GitHub username
    4. Now you can push your repo to the new remote the usual way.
    1. Navigate to the folder containing the local repo.
    2. Set the new remote repo as a remote of the local repo.
      command: git remote add {remote_name} {remote_repo_url}
      e.g., git remote add origin https://github.com/johndoe/foobar.git
    3. Push to the new remote the usual way. You can use the -u flag to inform Git that you wish to track the branch.
      e.g., git push -u origin master